# The EHR / LIS system
The EdEHR supports both Electronic Health Record or EHR systems and Laboratory Information Systems or LIS.
And someday soon you will see support for Electronic Medical Record or EMR systems.
- EHR is most often used in hospitals for short term encounters. Admission day is referred to as "Day 0".
- LIS is used for both in-patient and out-patient medical laboratories
- EMR is often used in community settings and supports long term patient care
You will see EHR throughout these help pages and the application because the EdEHR project evolved from the need to build an EHR.
But in nearly all cases you could insert LIS or EMR.
# The main EHR sections

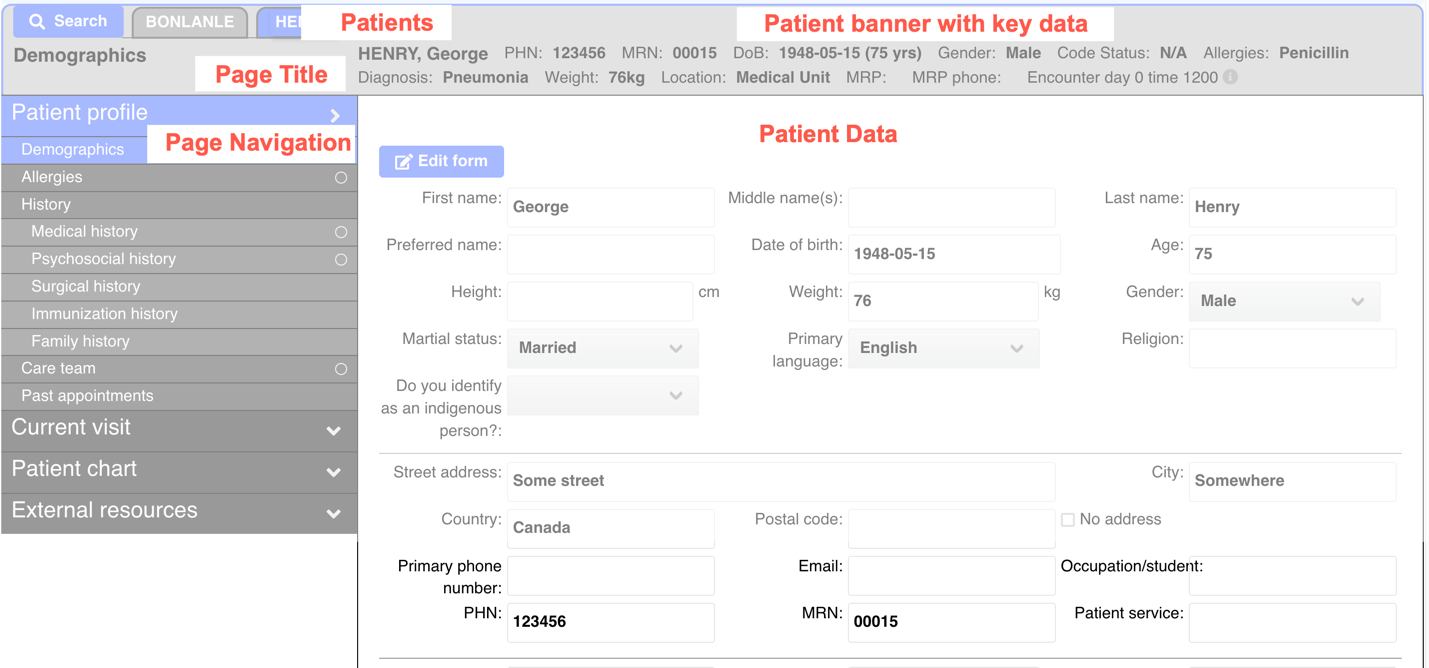
The EHR has five main sections:
- Patient search and tab bar
- Page title
- Navigation
- Patient information banner, and
- the main patient content
The Navigation section and page content depends on whether the case study requires EHR, LIS, or EMR. Content pages like Demographics will appear in all three modes, while other pages only appear in the appropriate mode.
# Patient search and tab bar
Use the Search button to locate your patient. You can repeat the search to view more than one patient.
Just as you will do in the real-life clinic.

Searching. Even parts of a name or MRN can lead you to patients.
Of course, the instructor will most likely provide instructions as to which patient to search for.

# Patient information banner
The patient information banner contains key pieces of information about the current patient.

The Current time and day is calculated based on the EHR records. See below.
From the Patient profile - Demographics page.
- Patient name. Last, First, Middle.
- MRN. The medical record number which is the patient identifier within the simulated application.
- PHN. The patient health number may be used for a simulated billing identifier.
- DoB. Date of birth. See below
- Gender.
- Weight.
- MRP and MRP Phone. The most responsible person may be next of kin.
From the Current Visit - Visit details and location page.
- Code Status. (DNR or MOST code)
Code Statusfield. - Diagnosis. From the
Physician admitting diagnosisfield.
From the Patient Profile - Allergies page.
- Allergies.
# Date of birth
The birthdate is calculated based on the patient's age and date of birth. The displayed year will always reflect the patient's age based on today's date.
To edit the Date of birth field on the Demographics page you need to enter a date. The year value
can be anything so just set the month and day to be the patient's birthday. For example, enter 1970-03-15 for a
birthday of March 15th. Then edit the Age field. If you enter 50 then the year in the date of birth will be
today's year less 50.
# Simulation day and time
In a real EHR the date and time come from the computer system. But the EdEHR is a simulated EHR so we need to provide the date and time values. Dates are based on encounter or visit dates. Day 0 is the admission day and each day the patient stays in the hospital or clinic the day increases. Day 1 is the second day of the encounter. Etcetera.
The value shown in the patient banner is the maximal day and time found in all the EHR records. For example, see records for any of the many assessments. As we enter records into the EHR we set the record day and time. If we add a record with a day and/or time that is greater than a previous record then we advance the simulation time.
# Page forms
Many of the content pages collect information via a form directly on the page. Examples include the Demographics, Allergies, Medical history pages and many more. If you are allowed to edit the form then you will see a Edit form button
near the top of the page. Press this and start to edit.
Cancel to abort your edits or Save when you are ready.

At the bottom right side of the page there is a Reset form data button. This resets the form to either
- The base case data if you are a student working on an activity or
- The default values for the form (mostly empty) if you are a lead instructor and are working on the case study.
# Draft reports and verifying correctness
Some assessments are very lengthy and they require considerable effort to complete. The good news is that you can
close the dialog form and your work is saved in a draft report. You can come back later and continue to work
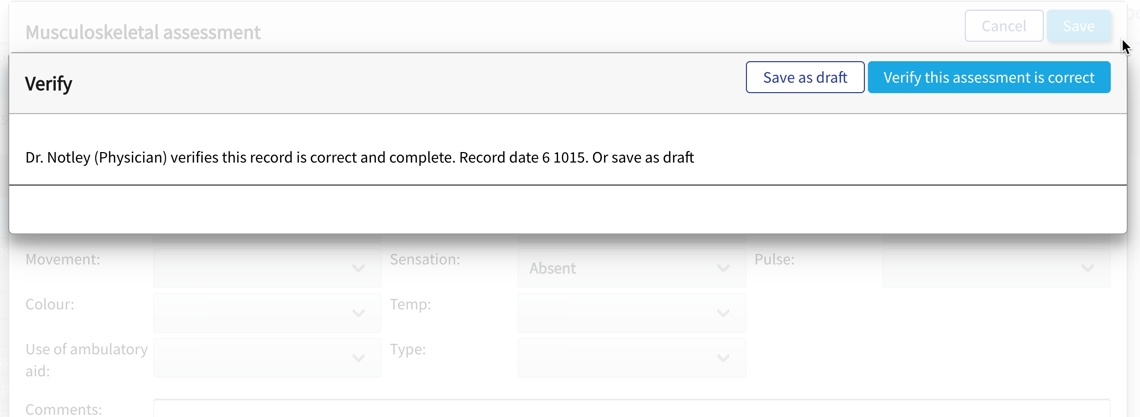
towards completing the report. Just press the Save button and you will be offered two choices.

You can save the current report as a draft or verify the report is correct and complete. Once you verify the report can not be modified.

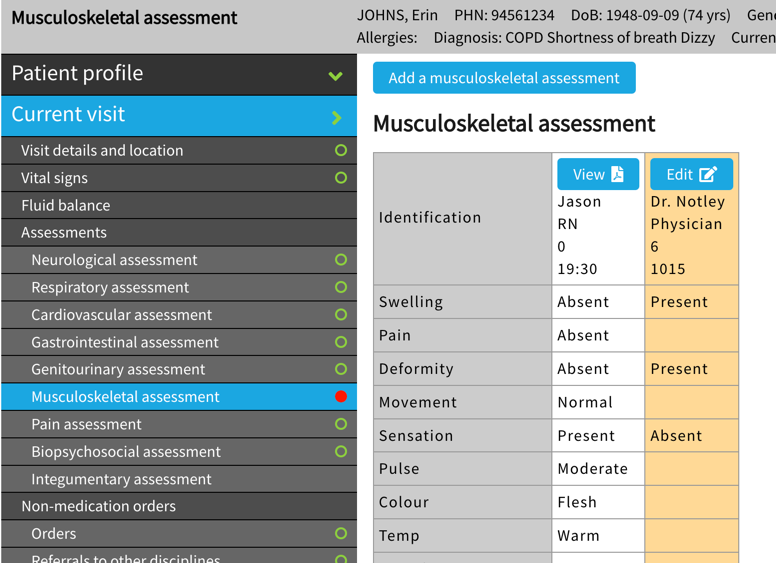
When a page has a draft report/assessment you will see a red dot beside the page name, and when you view the page the draft row will be displayed with an amber background colour.
To continue editing the draft you can either (1) press the Edit button on the draft row or (2) select the main
table Add ... button at the top of the page.