# Instructors and the class list
This section of the documentation is meant for healthcare educators who conduct classes and simulations with students. This section describes how an instructor can view an EdEHR activity and review their student's work and generally navigate and use the EdEHR.
Effective health record documentation is much more than just entering data. First there is the need to learn about critical decision-making based on the evidence. Evidence which comes directly from the patient but also from the electronic health records. These records can be complex and lengthy. As well, healthcare students need to develop communication skills that support the care team who is helping the patient. Developing these skills requires guidance from faculty and practice on the part of the student. Practice within the safety of the simulation setting.
# Terminology
Learning Management System (LMS) : Any healthcare educational institution that uses a learning management system to deliver course content and manage teacher/learner interactions can use the EdEHR. Sample LMS systems include Brightspace, Blackboard, Canvas, D2L, Moodle and more.
LMS Activity : A learning management system course contains many links to activities; which may include quizzes, readings, videos, or connections to the EdEhr
EdEHR Activity : Each LMS Activity that links to the EdEHR will connect to a single EdEHR Activity. See Activity below. Every EdEHR Activity must be linked to an EdEHR Learning Object to provide the case study.
EdEHR Learning Object : A Learning Object connects the Activity with an optional Case Study, and it provides a place to set learning objectives. The EdEHR Learning Object is a reusable component that can be used by any number of Activities.
They will set up the Learning Object to contain a description of the learning objectives, and a link to an EdEHR Case Study. They will also establish the link between the EdEHR Activity and the EdEHR Learning Object. (See the Course designer guide.)
EdEHR Case Study : Any number of EdEHR Learning Objects may wish to use the same simulated patient data. This is why the EHR data is placed in another reusable component called the EdEHR Case Study. Think of this as a snapshot of a EHR database, focused on a particular patient at a particular point of time in their hospital stay.
We usually drop the EdEHR prefix and just call the above "Activity", "Learning Object", and "Case Study"
# Class lists and students
Prerequisites. The following assumes that your LMS admin and course content creation teams have set up your course with EdEHR activities, and they have made the first connection to the EdEHR. See more in the LMS Admin and Course designer guides.
All users access the EdEHR via their learning management system (LMS). The LMS provides the authentication and authorization, which means, the LMS says whether a user is a student or instructor. When student users access the EdEHR they are added into the class list for the EdEHR Activity. Instructor users can see this class list as well as they can view the EdEHR Learning Object and Case Study.
Please review the Student guide to understand what a user with the rule of student can do in the EdEHR.
Please review the Electronic health records pages to understand more about the EHR side of this application.
# Instructor's dashboard
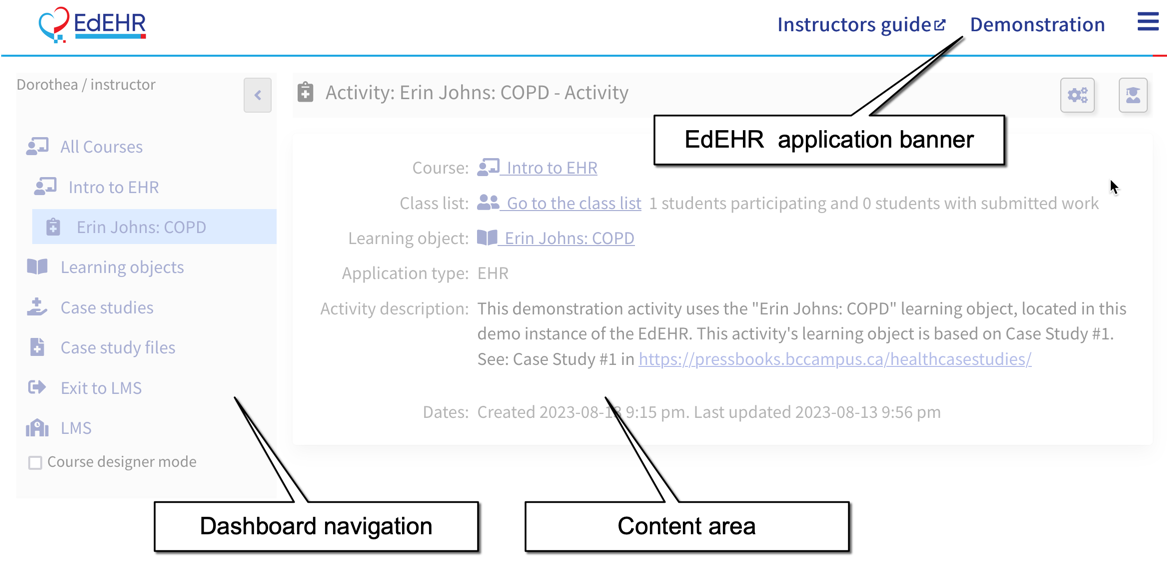
When instructors access the EdEHR they start on the EdEHR Activity page, in the instructor's dashboard.
TODO ....
These dashboard pages have three main sections: the application banner, the navigation section on the left and the main content.
The Application banner has
- a link to this page of the documentation.
- a link back to the demonstration log in page but this only appears when you are using the Full demo
- the
Instructors tool menuthat contains the same items as appear in the navigation section.
The Dashboard navigation is described here Instructor tool guide
The Content area displays the page content. E.g. the Activity, Course, Course List, Class list, Case study, Learning Object, or Case study file listing.
# Activity
An Activity is automatically created when a user clicks an LMS Activity. After this first click all the users who click that LMS Activity will be able to access the EdEHR Activity.
An EdEHR Course is also created, automatically, when needed.
When a student user clicks an LMS Activity they will be automatically added to the EdEHR Activity's class list, and they will be taken to the charting area to complete their work. Students can view the Activity's title and instructions, so these are good places to guide the student.
When instructors click the LMS Activity they will visit the EdEHR Activity page.
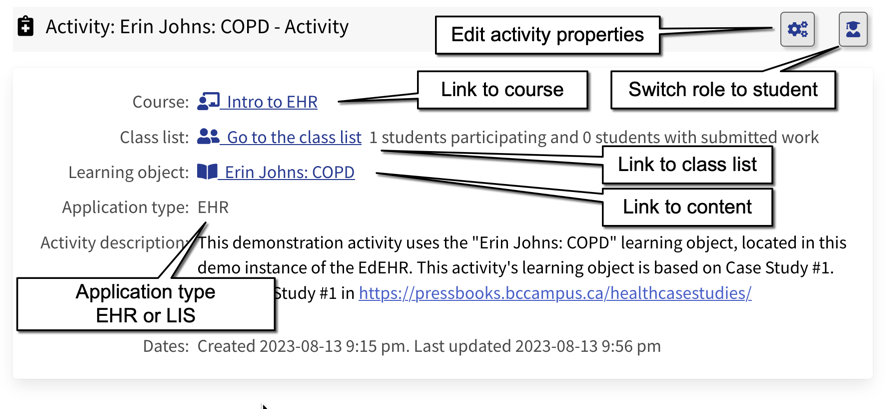
The Activity page displays
- the title
- the instructions (description)
- a link to the Activity's Course
- a link to the class list
- a link to the Learning Object the activity is linked to
- the application type: EHR or LIS (derived from the Learning Object's Case Study)
- the dates when the activity was created and last accessed or modified
Instructors can and should edit the title and instruction. They can also go to the Course page and change the Course name and description.
Every EdEHR Activity must be linked to an EdEHR Learning Object to provide the case study.
Every semester instructors will recreate their course in their LMS. They will need to try each activity and link it to the desired Learning Object. See Step 3 in the content creation section
# Evaluating assignments
Instructors can assess the class list via the Activity page.
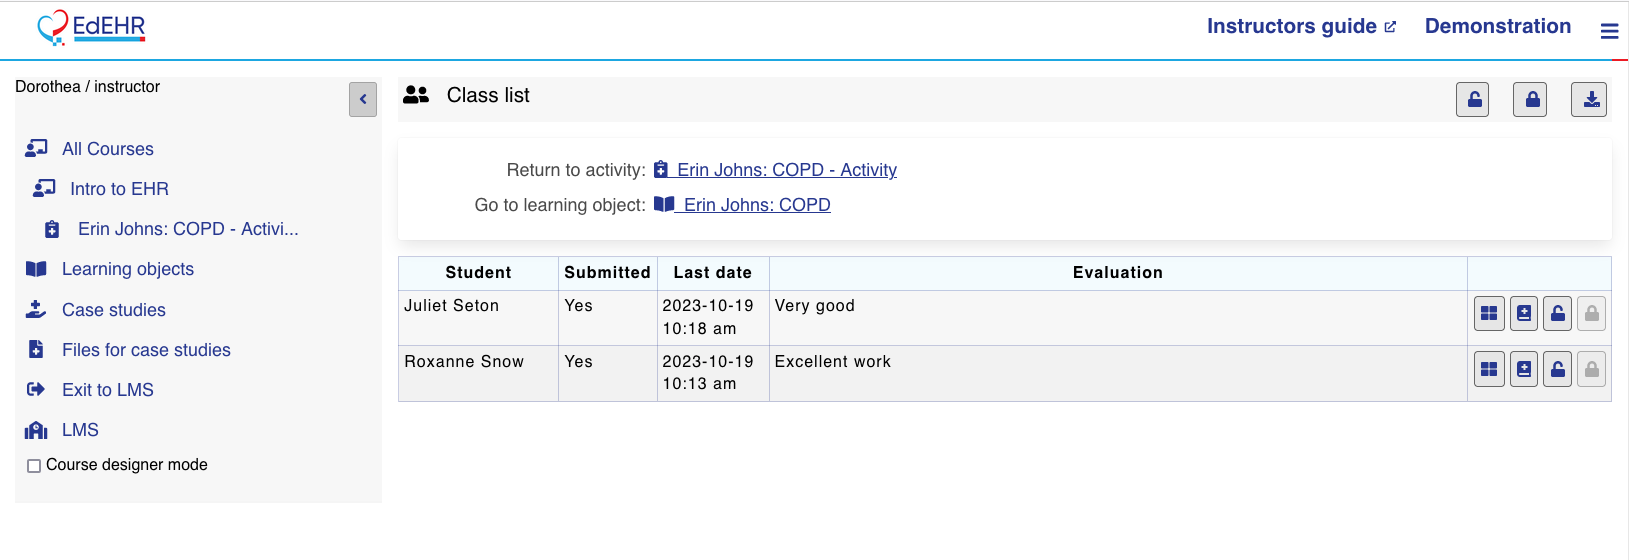
Only when a student's work is "submitted" can an instructor review and comment on the student's work. Students normally submit their work but instructors can toggle the submission status on a per student or whole class list basis. The status of all students can be set with the "All students can edit" and "Force all submissions" buttons. Instructors can toggle the status for a particular student with the "Force submission" and "Send back" buttons.
A student's work can be evaluated by selecting either of the buttons. The 'Evaluate' button will show the student's work in the condensed view, without any base case data. The 'Eval in EHR' button will show the student's work in the EHR with base case data.
In both views the instructor can see a persistent evaluation panel. It has a notes section plus the ability to save edits to the notes, and to progress forward or backward in the class list.
 This panel also lets the instructor force the submission state with
 Force submission or let the student continue their work with the Send back button. There is also a button to switch between the two evaluation modes: Eval in EHR or Evaluate.
# Evaluation in the EHR
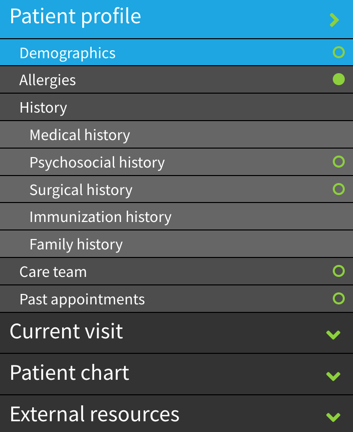
While evaluating the student work in the EHR the instructor sees both the student's work and the base case study. Look at the navigation panel. You will see a solid green dot on a page that has student data.
If the green circle is empty then that page has data from the Case Study.
If the dot is red then the page has a draft record.
This normally means the student started to document some assessment and did not verify the report was complete and correct.
# Evaluation in condensed view
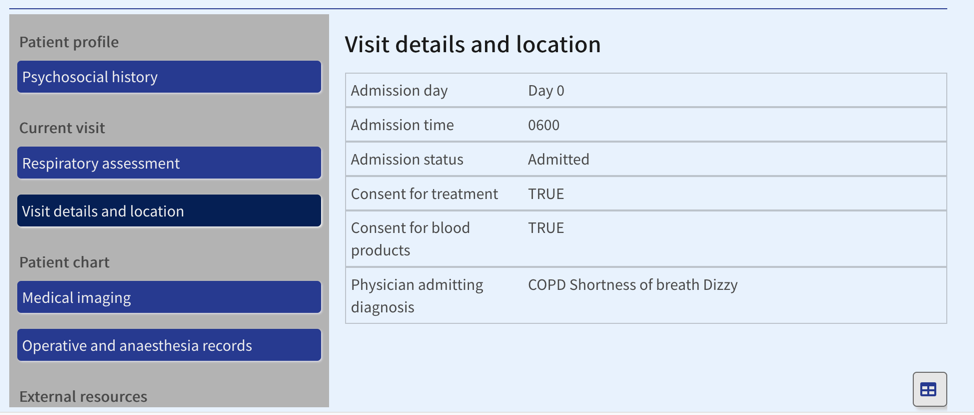
The condensed view shows just the work submitted by the student. The pages with tables also shows a button that you can use to toggle the table orientation to/from horizontal/vertical.
Again if the student started an assessment and did not verify it then the draft record will appear with an amber colour.
The condensed view also displays tabs for each patient involved in the student's work.
# Download and save evaluation notes
From the Activity page select the link to the class list. Then select the Download evaluation notes to download a CSV file, named after the Activity, containing the class list with evaluation notes. This file includes: givenName, familyName, lms_user_id, and instructor's evaluation notes.
Someday this download will also include the student's content as a means to record their work along with their evaluation.
# Importing evaluation notes into the LMS
Someday the EdEHR will support LTI 1.3 and will be able to push evaluation information into the LMS without the following.
Schools place the students' grading information in the learning management system. It is possible to import the CSV download file and map the data into the LMS. Check you LMS manual for instructions on importing this CSV file into the grade book.
# Skills Assessment
On the Course page instructors can control the Skills Assessment Mode.

Click one of the stop watch buttons, on the right, to enable Skills Assessment and restrict all students to seeing and working with just the selected activity. You can select one or more activities, allowing students to work with all selected activities.
Click through the confirmation to enable Skills Assessment

Once active an activity will have a green background.
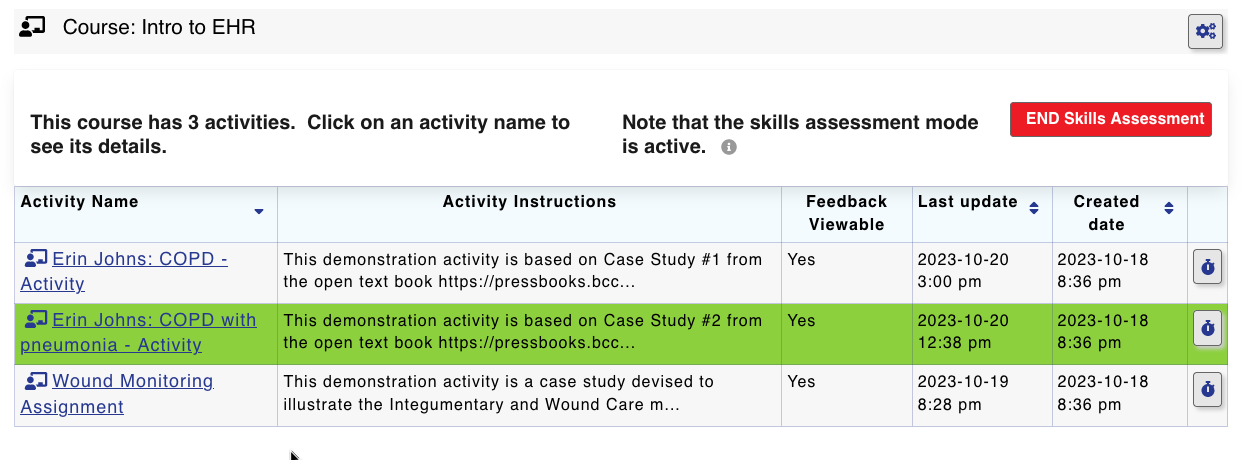
To deactivate skills assessment mode either (1) reclick the stop watch button to unselect all activities or (2) press the END button to clear all selections.
See student skills assessment to see what your students will experience.